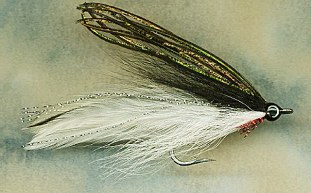
Invicta Flies - Lefty's Deceiver
There is little one can do to improve upon this great classic pattern. It can be tied in various ways to apply to many different situations, so its possibilities are endless. My reason for placing here is the method for creating the head. Replacing the painted-on eye with the epoxy-cover decal eyes improves the appearance and durability of the finished fly dramatically.
 |
 |
Hook: Mustad 34007, #1/0
Thread: 3/0 waxed monocord, black
Tail: white saddle hackles
Body: silver Sparkle Braid
Flash: silver Flashabou Accent
Collar: white and black bucktail
Throat: red Krystal Flash
Topping: peacock herl
Head: tying thread, Loon's Hard Head (black), 5-minute epoxy
Eyes: 2 mm prismatic stick-on, silver
Tying Instructions:
1) Start thread on shank above hook point. Select six white saddle hackles and stack them into two bundles, the feathers in each placed the same way (curving up or down). Straddle the shank with the two bundles so the tips curves inward. Align the tips and measure for length- tail should be two and a half to three times the shank length. Holding the bundle so it leans slightly toward you, take a couple loose turns of thread, then pull down to tighten and position the bundle on top of the shank. Take four or five more tight wraps to secure, then clip the excess. Cover the butt ends. If the saddles do not want to behave with this method, try tying in two at a time or trimming the fibers from the stems in the area they are do be tied down.
2) Tie in the Sparkle Braid directly on top of the tie-down area of the saddles so the portion to be wound extends back past the bend. Lash the material to the top of the shank all the way to one and a half hook-eye widths behind eye. Wind the Braid forward. Once past the "bulge" of the tail tie-in area, overlap the material some to produce a more even body. Tie off at the thread and clip the excess.
3) Tie in eight or ten strands of Krystal Flash or Flashabou Accent so they extend to the tip of the tail. Divide a little so equal bundles (four or five strands each) are on each side. Clip excess.
4) Begin the collar by tying in a bundle of white bucktail (pull out the shortest fibers and leave the rest uneven) slightly smaller than a matchstick in diameter on the near side, bottom of the shank. Allow the fibers to spread around this quarter of the shank. The longest tips should extend to the middle of the tail, and the bundle should rest against the hook bend. Clip the butt ends at an angle and cover with thread wraps. Cement for durability. Repeat for the far side, bottom of the shank. When finished, the bottom half of the collar should be full, with two equal bundles on either side of the hook.
5) On top of the shank, tie in a matchstick-size bundle of black bucktail, the longest tips again extending to the middle of the saddle hackle tail. Allow the fibers to spread out evenly around the top half of the shank. Clip the butts at an angle. Tie in another bundle of black bucktail, half a matchstick in diameter, in the center of the previous bundle. Clip and cover the butts.
6) On the bottom of the shank, tie in a dozen or so strands of red Krystal Flash about two and a half times the hook eye width in length. Clip the excess. Red Flashabou can also be used, but the Krystal Flash seems to allow for an illusion of bulk without extra material. The Flashabou lays flat. Use the material that best suits you preference.
7) For a topping, tie in six to eight strands of peacock herl with unbroken tips. These should extend to half way between the tip of the tail and the tips of the bucktail collar. Clip the butts and cover with the thread.
8) Build up/smooth out the head with the thread, whip finish, and cement well. Allow to dry.
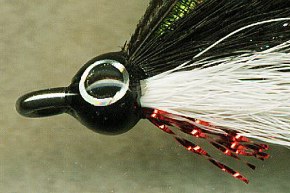
9) Apply two or three layers of Loon's Hard Head in black to the head, allowing plenty of time for each coat to dry thoroughly. Apply as many coats as it takes for the head to become just barely larger than the diameter of the 2 mm decal eyes. When the head is large enough and the Hard Head completely cured (I usually allow at least half a day), apply the decal eyes on each side in the center of the head.
10) Coat the head with a good layer of five-minute epoxy. Hand rotate while it sets, the put aside to dry.