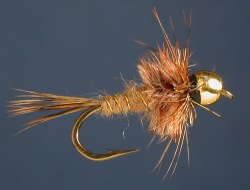
Invicta Flies - Ruff Drummer
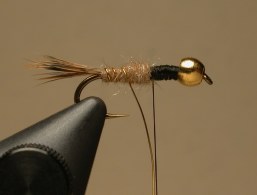
The Ruff Drummer gets its name from the the material used in the tail and hackle collar, the Ruffed Grouse (referred to as "Drummers" in some areas. These well-marked, soft feather fibers combined with the ostrich herl thorax, create remarkable life-indicative movement, no matter how the fly is fished. Lead wire and a brass bead gets it down in a hurry, or you can omit the lead wire for a slower sink in calmer waters.
Hook: Mustad 3671, #12-18
Thread: Danville's Prewaxed 6/0, black
Head: taper-drilled brass bead
Weight (optional): .015 lead wire
Tail: grouse body feather fibers
Ribbing: fine gold wire
Abdomen: tan or light brown dubbing
Thorax: ostrich herl, brown and white mixed
Collar: grouse body feather fibers
The following article illustrates how to tie this pattern, but the techniques can be applied to many different flies to increase durable or provide material options.
Tying Instructions:
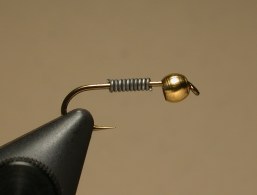
Step One- weight
 |
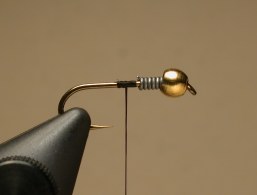 |
Use needle-nose pliers to smash down the barb on the hook. Place the bead on the shank, inserting the hook point into the smaller hole so this ends up at the hook eye. Insert the hook into the vise. Take about ten turns of lead wire around the shank, using your fingernails to squeeze the wraps tight together. Push the lead wire up into the brass bead, then secure the tying thread behind. Cover the lead wire with thread wraps. To do this, use your fingernail to push on the wraps, forward to keep it tight, then loosely wind the thread over it in open spirals to the bead. Wrap back loosely to behind the lead, then forward with tighter, closer turns. Repeat until the lead is covered, build up a smooth taper with the thread behind it, then wind back to the bend.
|
 |
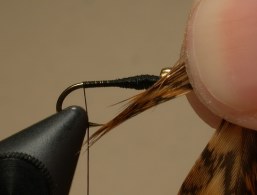
Step Two- tail and ribbing
Select a well-marked feather from the back of a ruffed grouse skin. Seperate a segment about as wide as the hook gap, then align the tips by bending the segment toward the butt end. Hold onto the tips and cut the segment from the feather. Use your right hand to fold and pinch the segment into a bundle, then grasp the clipped ends in your right hand. Hold this bundle against the hook to measure for length (=3/4 hook shank). Switch the bundle back to your left hand, using your thumbnail to mark the tie-in point, and tie the bundle in at the bend: hold the bundle at an angle and
|
 |
take a loose turn of thread around it; pull up on the near side of the hook and let the thread torque pull the fibers up on top- allow the fibers to splay a bit; take two more tight turns of thread in front of the first to secure. Lash the butt ends to the top of the shank up to the taper behind the lead wire. Clip the excess at an angle and cover with the thread.
|
 |
 |
Wind back toward the bend a couple of turns. Place the tag end of the wire ribbing on the far side of the hook, yet in front of the tying thread. Take two turns, pull down to tighten, and cover any exposed forward wire with the tying thread, creating a smooth transition into the taper.
|
 |
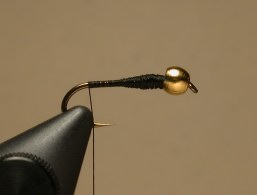
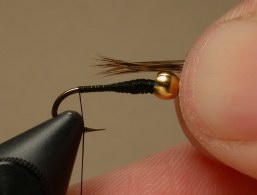
Finish lashing on the ribbing by holding it below the level of the hook shank and tightly winding the thread back to the bend. The thread torque should move the ribbing to the underside of the hook. Once at the bend, spiral the thread forward one wrap in front of the tail. We are now ready for the dubbing.
|
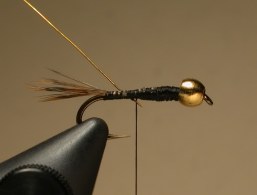
Step Three- dubbing
 |
 |
For the abdomen, you can use any tan or light brown dubbing such as beaver or rabbit. Here, I have used a blend of natural brown mink underfur mixed with about 1/4 as much cream Antron dubbing. Spin the dubbing onto the thread without wax (so we get a somewhat shaggy look), keeping it very thin near the hook and getting a little thicker as you work down the thread. Slide this up to the shank and take a turn around. Your second turn with the dubbing goes behind this first one, and the next overlaps it going forward. Essentially, what this does is lock down the sparse fibers so we have a fully covered abdomen near the tail with no thread showing and no excessively long stray fibers out over the tail. Continue winding the dubbing forward in slightly overlapping turns, filling in any gaps to maintain the tapered look. Stop at the half-shank point and take a couple extra turns of thread to anchor the last fibers of the dubbing. Note that the brass bead covers a little more than 1/3 of the front half of the shank...keep this in mind so you don't make the abdomen too short.
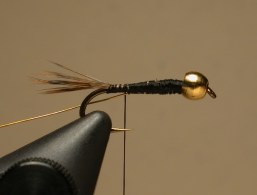
Counterwrap the ribbing by going up on the far side of the hook, over the top, then down on the near side. Keep the spacing somewhat close to get five or six wraps before you reach the tying thread. We "counterwrap" the ribbing for a couple of reasons. For one, it makes the ribbing more visible. The other is to help bind the fibers so the shape is held through a few more fish. At the front of the abdomen, bind the ribbing down with three turns of thread and clip the excess wire with wire cutters. Use your fingernail to push the clipped end down and cover this completely with the tying thread...be careful as the sharp edge of the wire can sever the thread.