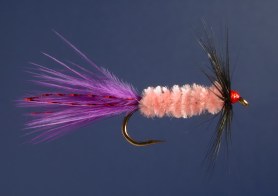
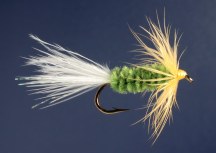
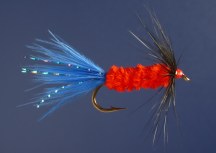
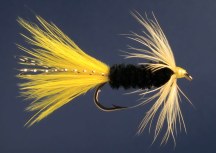
Invicta Flies - Confetti
Ahhh! Spring again! Well, maybe not quite. BUT, you can beat back the winter blues by digging out all your bright spring-like colors and tying these bright, cheerful, easy Confetti's. Why? What are they good for? Crappie! It's well-known that crappie love to eat little minnows, and there are many good minnow imitations for the fly fisherman. But it is often forgotten that these fish are also fond of bright, bold colors that don't seem to represent anything. This is a very easy pattern, a good respite from hatch-matching and complex patterns. Anyone from beginner to advanced can tie these, so there is no excuse to not have a well-stocked crappie box. Not too many rules... use some weight to help get the fly down, use bold, bright and/or contrasting colors, and be sure to use hen for the hackle for good fish-attracting motion in still waters. A bright tying thread like red or yellow, even flourescent, adds to the appeal.
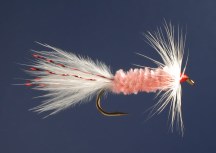
Hook: Mustad 9671, #6-10
Thread: Danville's Prewaxed 6/0
Weight: .015 lead wire
Tail: marabou, Krystal Flash
Body: medium chenille
Collar: hen hackle
Head: tying thread
Tying Instructions:
1) Place hook in vise and wrap on the lead wire to cover most of the shank. Leave bare two or three hook-eye widths at the bend and right behind the eye. Start the tying thread behind the eye, then wrap rearward over the lead wire, then forward again, just loose enough not to seperate the lead wraps. Now wind the thread a bit tighter back and forth over the lead wire to secure, about six or seven times.
2) Clip a bundle of marabou and even up the tips a little. Stack bundles for more bulk. Measure against the hook and transfer to your non-tying hand, using the thumbnail to mark where the tips are as long as the entire hook. Tie this in at the bend with four tight turns of thread, then clip the excess to blend with the wrappings over the lead wire.
3) On each side of the tail, tie in two strands of Krystal Flash. Trim so they are about as long as the tail.
4) Coat the thread wraps over the lead wire and tail with a thin layer of head cement. About the time you arrange the next step is plenty of time for it to soak in. Though it's not necessary, you can allow some time for the cement to dry completely.
5) From the tag end of the medium chenille, strip the material off the last 1/8 inch, exposing the core. Tie this core in at the bend on top of the hook shank with four or five tight, spiralling wraps of thread. Continue spiralling the thread up to just in front of the lead. Tightly wind the chenille forward to the thread, in close, but not overlapping turns, and tie off with three tight turns. Clip the excess, then cover any exposed clipped ends with the thread.
6) Select a hen cape hackle with fibers approximately equal in length to the chenille portion of the body. Clip the stem just above the marabou-like fluff at the base of the feather. Now trim five or six fibers off both sides. Lay this trimmed portion against the hook shank just in front of the chenille at an angle, the tip up and leanig slightly toward the far side. Take one loose turn of thread around it, just in front of the bottom-most full feather barbs. Now pull down slowly on the thread to apply tension and allow the feather to twist slightly, untill it's in a good position for winding (the feather barbs perpendicular to the shank). Immediately take three or four more tight turns of thread in front of the first to secure. Clip any excess stem that may be protruding into the hook eye area. Take four turns with the hackle (use pliers if necessary) and tie down with three tight turns of thread. (It's fine if the hackle wraps go into the head...see next step.)
7) Build up a very full, rounded head with the tying thread. About one-third the diameter of the chenille looks about right. Take several turns back over the hackle to help leaning it back and make it more durable. Whip finish, clip the thread, and coat well with head cement for a glossy look.
These can be fished in a variety of ways. Slow, with sharp twitches, add a split shot a foot above for a jig-like motion, use a floating line for shallow-holding fish, sink-tip or even full sinking for deeper presentaions. Research local sources for crappie activity at different times of the year to determine the best starting point and methods.
So what's the best color? Good question and a funny thing. They like different colors on different days in different places, so be sure to tie a wide range. Being so easy to tie, be sure to have a few of each color to make up for lost flies (crappie like to hang out in brush), and to hand to your buddy when he comes up blank. Why not just tie it in minnow colors? There are lots of good minnow flies that do a better job there. This is mostly an attractor pattern, so save this for the wacky, crappie-loving, colorful flies.
As winter drags on, put aside the eye-straining, nerve-wracking patterns for an evening, and tie your supply of crappie flies in preparation for the spring crappie season. Let the colors remind you of the flowers to come, the warming sun, the sprouting foliage. Fill your panfish box with an explosion of crappie Confetti! Most of all, have fun!
Some possible color combinations:
 |
 |
 |
 |
 |
 |