Invicta Flies - All About Biots
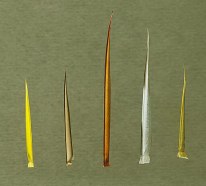 Left to Right: amber goose; brown goose; brown turkey; wild turkey; olive turkey
|
What is a Biot?
A biot is simply a single fiber from the leading, or front, edge of a primary (first row) wing feather. On the feather, the biots lay against each other, leaning toward the tip of the wing. This allows air to pass over them and flow against the fibers on the rear side of the feather, which are longer, narrower, and more delicate, providing lift for flight. This is similar to an airplane's wing... wide, blunt in front, tapering toward the rear. It is easy to tell the biots apart from the rear fibers, as they are shorter, stiffer, and lay closer to the quill stem.
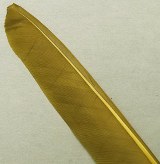 Turkey quill dyed olive.
|
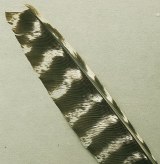 Wild turkey quill.
|
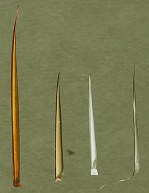 l-r: brown turkey, brown goose, white duck, hen pheasant.
|
As with all things in nature, not all biots are created equal.
This, of course, is good, for it allows us to achieve varied effects on a wide range of hook sizes. Note the photo above. Goose biots are generally shorter than turkey biots, but as shown by the olive turkey biot on the far right, this will depend on the size of the bird, the particular feather from the wing, and where on the stem the biot was extracted from. If you purchase biots, always examine them first to make sure there are enough fibers long enough (or wide enough) for your particular needs.
These days, the most common types of biots used in fly tying are goose and turkey. These are often dyed to various colors which allow us to match local insects or create some wonderful attractor-type patterns.
There are, however, other types that can greatly expand your pattern oppurtunities. Wild turkey biots are nicely mottled and when wound as the body create a two-tone, distincly segmented abdomen. Duck biots are smaller and more delicate, allowing for a bit more movement in tails, or a closer match to antennae on stonefly nymphs or sowbug tails. For a great mottled midge pupa, use a biot from a ringneck hen pheasant. The possibilities are endless and are limited only by your imagination.
Tying With Biots.
Okay, we know what biots are and where they come from, now let's see how we can use them.
Tails and wingcases. If you hold up a single biot, you will see that it has a natural curve to it. For tails and wingcases, you need only decide if you want the tail/wingcase to curve up or down. Make sure both segments curve the same way. Hold both fibers together and tie them in at the same time.
If you like the tails on smaller nymphs such as the Prince Nymph to curve outward and up a little, the tie-in is easy. Simply hold the two biots so one curves away from the other (front to front), then measure for length. Hold the biots by the tips at the hook bend, take two loose turns of thread around them, then pull down and toward you to tighten the wraps, holding the biots in place so they don't twist to the far side of the hook. Take a few more turns in front of the initial wraps and clip the excess butts. Cover any exposed butts with the tying thread.
To have the tails curve downward requires a different approach, and is the same one that is used on larger nymphs, whether the tails on those curve up or down. Apply a small amount of dubbing that matches the body color to the hook bend. A ball of dubbing equal to about half the hook eye in diameter should be sufficient. Hold both biots, one on top of the other so they curve the same way and the biot on top crosses over the biot on bottom with its tip on the far side, butt on the near side of the hook. Measure for length, then hold against the shank just in front of the ball of dubbing, leaning slightly toward you on top of the shank. Take a loose turn of thread right where the biots begin to seperate, then pull down, using the thread torque to position the tail. Continue to hold the biots in place as you wind back a couple turns into the dubbing to lower the tail closer to the horizontal plane. Wind forward again to in front of the intitial tie-in to anchor all into place. Clip the excess.
 |
For wingcases, the procedure is much the same as the latter technique for the tails. To help minimize thread wraps at the head, measure the biots for length, then clip the butts, leaving just enough for tying in (about a hook eye's width). Depending on the pattern and how much of a base is built up at the tie-in point, this can be difficult, as the thread may tend to slide off the end of the biot. If this becomes a problem, go ahead and tie in the biots, then clip the excess. Untwisting the thread so it wraps flat can help in this case, just be sure to twist it back again before whip finishing.  NEXT PAGE