Invicta Flies - Peacock Herl
 |
 |
 |
You can apply many of these techniques to ostrich herl.
|
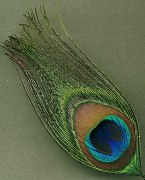
Perhaps no other natural material has as many fish attracting qualities as peacock herl. It is one of the most used materials in fly-tying, but there are a few "tricks" to get the most from this wonder of nature.
Wing Topping
 Left: broken tip
Right: unbroken, full tip
|
On streamer patterns which call for peacock herl as a topping to the wing, such as the Royo, use only full, unbroken tips. Tips of this sort follow the taper of the wing, flow smoothly when the fly is fished, and looks much nicer, to us and the fish. Save all the broken tip herls for wrapping bodies and such.
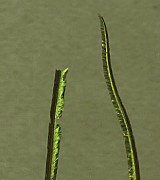
You will notice a natural curve to the herl fibers. Try to get all the herls to curve downward. In the photo at left, the herl on the right curves toward the left. You can see the natural flow of fibers on the left side of the herl sticking out from the stem... these should point downward on the finished fly. The fibers on the rights side of the herl are about as long, but are leaning closer to the stem, and should end up as the top of the wing. To achieve this, place the herls together one by one, aligning the tips, the natural "flow" the same. Lightly stroke the aligned herls from end to tip. This will help hold them together. Place the bundle (typically four or five fibers) on top of the hook shank, leaning slightly toward you and on the near top side of the shank. For best results, keep the individual fibers side by side, or if that is not feasible, in a stagger which keeps the fibers all flowing in the same curve. Bring the tying thread over the herls lightly, so as not to twist them. Then pull down with steady, even pressure on the far side of the hook. The thread torque will bring the herls directly on top of the shank. All the herls should now be curving downward toward the tail. Take three or four more tight wraps of thread in front of the first to secure.
Body Material
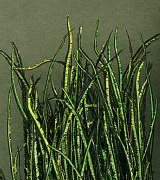
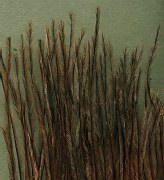
 Untwisted "rope"
|
The method that follows allows one to wrap peacock herl bodies that are full, yet won't unravel or fall apart on the first fish. You can use this technique for everything from Royal Coachman dries to Prince Nymphs.
For flies of size 12 and larger, I prefer to use four strands of herl. For sizes 14 and 16, three strands. And for size 18, two or three, depending on how full the pattern needs to be.
1.) Select the appropriate amount of herls. Grasp them between the tip and butt end and tug slightly. Any weak points in the stem will break off. Doing this now will save you some aggravation later if a weak point breaks while wrapping. Align the tips of all the herls.
2.) Tie the bundle of herls on top of the hook shank at the rear of the body or thorax, or whatever area will be wrapped, butt ends extending beyond bend of hook. Wrap the thread forward over the tips to secure, then wrap back again to the original tie-in point.
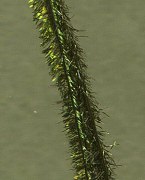
3.) Stroke the herls backward so the fibers stand out from the stems at a 90 degree angle (see photo above). Now twist the herls together to form a "rope." A spring-type clothes pin or hackle pliers helps with this. You will see the herl fibers spin. Continue to twist until you have a full rope with little indication of the twist.
4.) Wind the rope forward in touching wraps to the front of the peacock herl area, whether it is the thorax, or the whole body, then wind back in an open spiral to the thread. Tie off and clip excess herl.
5.) Spiral tying thread forward through the herl to the front of the area and finish the fly.
Note: An alternative method would be to form a loop with the tying thread before tying in the herl. Twist the loop with the herl and wind this forward, then tie off. This allows for a slimmer area of peacock herl.