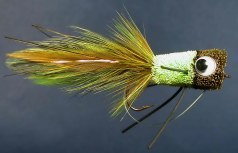
Invicta Flies - Deer Hair Popper
For decades, poppers have been a staple for fishing largemouth and smallmouth bass, as well as many other species. A Deer Hair Popper lets you custom shape the fly in any color/pattern you can think of. Use a non-slip loop knot to attach this to your leader. Cast near shallow structures and weedbeds, let it sit until the water settles, then sharply strip the line to "pop" it on the surface. Be prepared, however, for instant takes as soon as the fly hits the water. Poppers bring explosive strikes and make for some of the most exciting fishing available.
Hook: Mustad 37187, #10, 6
Thread: 6/0, color to match body & 3/0 waxed monocord or Kevlar thread for spinning
Tail: bucktail, saddle hackles, Flashabou
Collar: two saddle hackles wound together
Body: deer hair, spun and clipped
Eyes: doll eyes
Weedguard (optional): 17 lb test monofilament
What follows is an in-depth article on tying the Deer Hair Popper. Click on the "Next Page" link to continue the article, which is three pages long. Feel free to print these out for your own personal use.
Tying Instructions:
Step One- weedguard
Secure the 6/0 thread to the shank parallel to the hook point and wrap back to the hook bend. Cut a five or six inch section of monofilament. Personally, I don't like to use anything bigger than 17 lb. mono, and will often go as small as 6 lb. on the the smaller flies when I know the weeds or brush won't be tight.
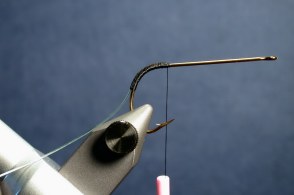 |
Hold the mono against the hook so one end is halfway between the hook point and the bend, the rest extending beyond the bend. Wind the thread back over the mono, pulling it toward you slightly to keep it on top. Keep the thread wraps tight and pull down every third or so wrap to pinch down a little into the mono. Continue winding to about a third of the way into the bend, then wind back up to the hook point. Cement the wraps and let this dry.
For the weedguard and tail section, I like to use black, brown or olive thread. Brighter colors seem to detract from the ovaerall appearance of the finished bug.
|
Step Two- tail
Select a color of bucktail that closely matches the planned tail color, in this case chartreuse. Clip a matchstick-size bundle and even up the tips by hand (pulling out the longer hairs and replacing them into the clump at the right lenghth). Leave the tips just slightly uneven, as this just looks better for this purpose than perfectly even tips.
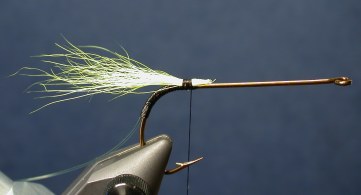 |
Measure the clump against the hook and mark with you thumb where it is as long as the shank. Tie the clump in at this point at the bend. To do this, take a couple loose turns of thread, holding the clump tight. Now pinch the bundle and the hook together, placing a finger on the far side so the bundle doesn't slide over, and pull down on the thread to tighten. If the bundle flares too much around the shank (we want to keep it as much on top as possible), hold the tip section and the butt section, and wiggle or pinch the bundle into place.
|
Take four or five more tight wraps in front of the first couple to secure. Lift the butt section so it is at about a 45 degree angle to the shank, and clip this with the scissors parallel to the hook shank. This gives us a nice taper to the butt ends. Do not cover the ends, but leave them as they are for now.
Tying in this small clump of bucktail, a tip from A.K. Best's "Production Fly Tying," helps keep the tail seperated when the fly is fished, and gives us a flatter base to tie in the tail feathers on each side.
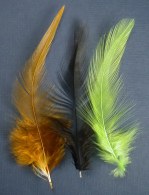
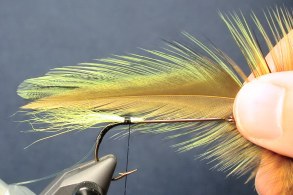
Select four or six wide saddle hackles to use for the tail. The best source for this is either the "strung" variety commonly sold or from Bass/Saltwater capes. Alternately, the large feathers found at the base of many dry fly necks will work fine. Two feathers per side is okay for a size 6 or smaller, but larger than that should have six. In this case, I'll use three on each side in different colors: chartreuse, black, and olive. When selecting your feathers, you will notice they will curve to one side or the other, and downward (looking at the top of the feather). Select three that curve to the right for one side of the tail, and three matching feathers that curve to the left for the other side.
Stack the feathers that curve to the left. This will be the near side of the tail, so be sure to put your chosen inside and ouside colors in the right place (the tail will curve outward and down). Manipulate them so the tips are even.
 |
 |
Measure the feather bundle against the hook and mark with you thumb where the feathers reach from the tip of the bucktail to the front of the hook eye. Switch the bundle to your "holding" hand, using the thumb on that hand to mark the length.
 |
I find it is much easier to leave the feathers as they are rather than trimming any fibers. This helps keep them from twisting out of place when tying in. The thread works itself between the fibers, and any that get bound down are not noticeable on the finished fly.
To combat thread torque moving the tail out of alignment, hold the feathers up to the light and arrange them so the stems are touching, but the inside stem is on top, the outside stem on bottom, and the middle stem
|
sandwiched between them. In this way, the feathers support each other and stay in place.
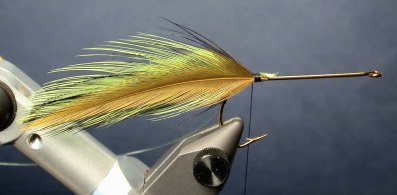
Hold the tail feathers so the stems are lined up with the shank and on the near side. Your thread should be at the rear of the tie-in area for the bucktail. Take two turns of thread through the feather fibers. If the feathers move out of place, ease the tension on the thread, readjust the feathers, then reapply the thread tension.Take three or four more turns of thread in about the same place to secure. Clip the excess butt ends, wind forward a couple turns over a portion of the exposed clipped ends, then back to the rear of the tie-in area.
Turn the hook over and repeat this procedure for the far side. This time, once the feathers are tied in, wind the thread forward to cover all the exposed ends of hackle stem, and most of the bucktail ends.
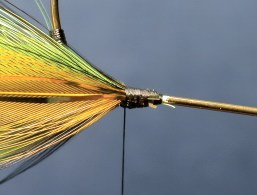 |
While we've got the fly in this position, we can go ahead and tie in the Flashabou for this side. Bring the thread back halfway into the tying area. Use two turns of thread to secure four strands of the Flashabou (I'm using gold for this fly). Reposition if necessary to line the strands up with the saddle hackle stems. For a different effect, you can spread the strands out to extend in a 90 degree angle beyond the tail. This will make the Flashabou really twist and move when the fly is fished. Here, I'm opting for the subtle flash of the standard method.
When the strands are positioned to your liking, continue winding the thread back to the rear of the tie-in area to secure them.
Turn the hook back over and use a similar method for the Flashabou
|
on that side. This time, as you wind forward, continue to wrap thread forward to cover the remainder of the bucktail ends.