Invicta Flies - Jassid
A classic pattern for summertime low water creeks. The jassid is easy to tie, so carry a variety in a wide range of sizes. Known to be particularly good for wild brook trout. Use light tippets and delicate casts to drift over likely holding areas. A little floatant applied to the hackle only is generally sufficient in most gentle summer flows.
 |
Hook: Mustad 94840, #12-18
Thread: Danville's Prewaxed 6/0, black
Body: tying thread
Hackle: dry fly hackle to match wing
Wing: body feather from ringneck pheasant or other birds
Tying Instructions:
1) Secure the tying thread to the hook shank near the eye. Wind back to the bend in smooth touching wraps, then forward again to halfway between the hook point and the eye.
2) Tie in a hackle feather that is standard for the size of hook being used. Make five or six close wraps, tie off and clip the excess. Trim the fibers from the top so there is a wide V-shape space in the hackle.
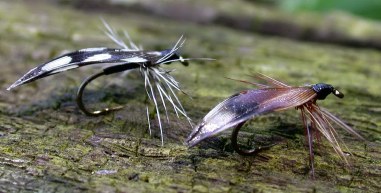
3) Prepare the wing- select a feather from the back of a ringneck pheasant. Other kinds may also be used, as long as the feather has good markings and is somewhat wide and intact (no ragged edges or missing fibers). In the photo above, the fly on the left uses natural guinea hen. Others may include partridge, starling (for smaller sizes), speckled hen, grouse, or woodcock. Use feathers that closely match local beetles in patterns and/or colors. Measure the feather against the hook- we wabt the length to be from just behind the eye extending about a hook gap beyond the bend. Mark the length by stroking the remaining fibers back toward the butt end of the feather. Now coat what will be the wing part of the feather on both sides with Dave's Flexament. Use the butt end still attached to tape the coated feather to a block of styrofoam or other surface while it dries. You can prepare several wings ahead of time.
4) Once the wing has dried completely, trim the butt end off and tie the wing on top of the shank, between the hackle fibers. Use the entire area between the hackle and the hook eye, making any necessary corrections to get the wing to tie in flat and straight (you may have to lean the wing slightly toward you to compensate for thread torque).
5) Build up a smooth, slightly rounded head, whip finish, and cement.
6) Trim the hackle fibers off the bottom, creating a wide, inverted V shape.