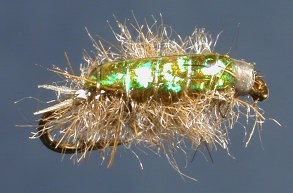
Invicta Flies - Flashback Sowbug
Sowbugs are a staple foodsource for trout in many larger rivers and especially tailwaters. This pattern adds an attention-getting flashback coated with epoxy to make it durable. Dubbing fibers of varying translucency and softness provide the illusion of flailing legs. Dead-drift this fly deep, bouncing it the bottom. This can make it hard to detect softer pick-ups, so when the indicator slows, just lift the rod tip and feel for the fly either coming free from the bottom, or catching in the trout. For the latter of course, which you will feel, immediately set the hook. Try fishing this fly by itself, as the lead wire foundation and epoxy make it heavy to start. If you do not catch bottom once in a while, add a small bit of weight 8-12 inches above.
Hook: Mustad 3906B, #14-18
Thread: Uni-Thread 6/0, gray
Weight: .015" lead wire
Tail: white goose biots
Ribbing: fine silver wire
Shellback: olive Stalcup's Flasback, five-minute epoxy
Body: dubbing blend= 75% gray antron + 25% olive hare's ear
Tying Instructions:
1) Prepare the dubbing by mixing gray Antron dubbing with an olive hare's ear blend, about 3/4 Antron and 1/4 hare's ear. Place this in a zip-lock bag or other container.
2) Secure the thread on the hook shank just behind the eye. Cut two pieces of .015 lead wire a hook eye width shorter than the shank. Lash one piece to the far side of the hook. Use your fingernails to hold the wire in place on the intitial windings. Take fairly loose turns of thread, pulling horizontally toward you on the thread to tighten. Continue to the bend of the hook, then forward again. Repeat this for the other piece of lead wire on the near side of the hook, pulling the thread horizontally away from you to tighten. Once that piece is secure, wind the thread back to the bend and coat the wrappings with head cement, or for added durabiliy, Zap-A-Gap or Superglue.
3) Tie in two white goose biots at the bend. Measure so the biots are about half a hook gap in length, hold them so they are splayed about 40 degrees, and lash them on using the lead wire wrappings as a base. Clip the excess.
4) Secure the fine silver wire ribbing along the bottom of the shank, the excess extending out beyond the bend to be wound later.
5) Trim a section of Stalcup's Flashback, olive, about equal in width to the hook gap. Tie this in on top of the shank at the bend, using the foundation to keep it flat. The excess should extend beyond the bend to be pulled over later.
6) Create a loop of the tying thread by doubling a length over and winding back over it. Bring the thread forward to behind the eye. Coat one side of the loop with sticky wax and insert fibres of the dubbing blend. Keep the clumps somewhat sparse to facilitate spinning, and add enough clumps to make a two to three inch rope. Close the loop and spin with a hook or dubbing whirl to form the dubbing rope. Wind this rope forward to the eye, stroking the fibers rearward on each wrap. At the tying thread, tie off and clip the excess.
7) Trim the fibers on top of the shank close. Brush/blow away the trimmings, then pull the Flashback material over and tie down at the head. Clip the excess.
8) Wind the ribbing forward, making the first turn over the goose biot tail, then spiralling toward the head. Move the wire back and forth to slip it between the dubbing fibers. Tie off just behind the eye and clip the excess. Build up a very full rounded head with the tying thread, whip finish, and cement the wraps.
9) Remove the fly from the vise and trim the fibers on the bottom down to the wire, leaving fibers protruding only on each side. Wet your fingertips and stroke these fibers downward away from the shellback. The fly is now ready to epoxy. You can usually do about six flies at a time, so tie a half dozen flies up to this point, then prepare the epoxy. Coat the shellback from the tail all the way over the top of the head, taking care it does not run into the dubbing fibers. Allow some time for the epoxy to cure.
10) Take each fly and trim the fibers on both sides unevenly. To do this, hold the fly sideways (hook point away from you, shank horizontal) and trim with the scissors about 45 degrees to the shank. Then repeat with the scissors perpendicular to the shank. About four or five cuts each way should do it. Trim any excessively long fibers- they should be no longer than the hook gap. Repeat for the other side.
11) Coat the underside of the fly with head cement, press with the pad of your thumb to flatten, and allow to dry.