Invicta Flies - Parachute Dry Flies

The parachute style of dry fly allows the fly's body to rest on the surface film, supported by the tail at the bend, and the horizontally wound hackle up front. This hackle, since more fibers are in contact with water's surface, is tied much more sparse than standard dries, and typically the fibers are longer.
We'll begin by tying in the post, around which the hackle will later be wound. This example uses white calf body hair, the most common material for parachute posts, but other materials may be used, such as poly yarn, Antron, mallard flank fibers, CDC feathers, marabou, and turkey flats, just to name a few.
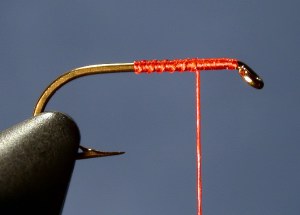
First you need a foundation on which to tie the post material to keep it from sliding around the shank of the hook. Secure the thread behind the hook eye, wind back for about half the shank, then spiral the thread forward to about two hook eye widths behind the eye. This is just slightly forward of halfway between the hook point and the hook eye. (See photo at right)
|
 |
Clip a bundle of white calf body hair about a matchstick in diameter (just visualize that you're holding a wooden matchstick). Hold the bundle by the tips and clean out any extra short fibers and soft "underfur." Even the tips in a stacker, or if you don't have one, simply realign the longer fibers to match the tips of the shorter ones.
Remove the bundle from the stacker and hold it by the clipped ends over the hook with your left hand. Measure by putting the tips at the front of the hook eye. You want the post to equal the length from here to the bend (using a hook eye width portion for the initial tie-in), so grab the tips with your right hand, using your thumbnail as a marker for the length.
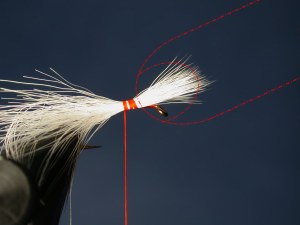 |
Keep the bundle in your right hand. Hold it against the hook shank at an angle, with your thumbnail at the tying thread. With your left hand, carefully wrap the thread once around the clump, letting it slide off your thumbnail into place. Let go of the bobbin so you can grab it again on the near side of the vise. Keep a hold of the bundle and make another turn of thread behind the first, this time pulling slightly as you make the turn to tighten. You will notice the thread torque begin moving the butt ends of the hairs toward the top of the shank. Repeat one more time, then let go of the tips and use your fingernails to position the bundle horizontally on the top... the bundle should lie directly on top of the shank, and straight.
|
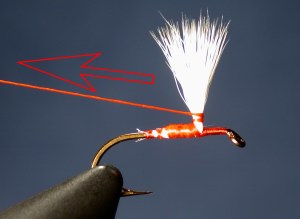
Take a couple more turns in the middle of the previous ones and tighten down to secure. Hold onto the tips of the bundle and clip away the butts at an angle, resulting in hairs longer and shorter than others. This will help create the smooth taper for the body. When all the butt ends are clipped, spiral over them with the tying thread toward the bend, then back again to the tie-in point of the calf hair. (See the photo below to gauge how the covered butt ends should look when wrapped)
It is not necessary to fully cover the butt ends, as you will end up doing this later anyway in other steps. Lift the tips of the bundle and take a few wraps underneath, helping to prop them up a little. Bring the tying thread behind the bundle. Carefully take three wraps of thread clockwise around the bundle only, making each wrap above the previous one. Gently tug back on the thread to tighten, then take three more wraps down the bundle. On the third wrap, at the bottom of the post, give a firm even pull on the thread to tighten it up. Maintain enough pressure to keep the post upright, and immediately take two turns of thread around the hook behind the post to anchor it in place.
|
 |
Apply some head cement to the wraps on the post, then wind the thread back to the bend of the hook.
Select a hackle feather with long, stiff fibers. These are best found on the sides of a rooster cape otherwise known as spade hackles. You can also use Microfibetts, a synthetic tailing material, moose body hairs, or the stiff guard hairs of various animals.
To use the hackle fibers, stroke the feather backwards to get the fibers to stand out from the stem. Grasp a section of the fibers and trim an amount appropriate to the size of fly you're tying. This is a judgment call, but generally, about half an inch worth of fibers is good for a size 16. More fibers for larger flies, less for smaller flies. Grasp the butt ends of the hackle fibers and check the tips for alignment. To even them up, you can bend the bundle one way or the other. When all the ends are even, measure against the hook for length. The tail should be equal to the shank plus the hook eye.
 |
Hold the fibers by the tips with your left hand, using the thumbnail to mark the length. Hold the bundle against the shank at the bend at an angle, with tips leaning toward the far side. Take a loose turn of thread, then pull down on the bobbin to tighten. Take three more tight turns in front of the first. The thread torque will move the bundle to the top of the hook shank.
|
|
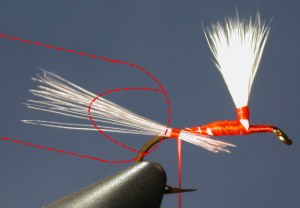
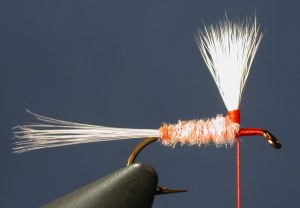
Clip the hackle fibers' butt ends at an angle, then spiral the
thread over them to blend in with the covered end of the post bundle, creating a smooth body. Wind the thread back almost the bend (see photo). This small space before the tail begins will give us a good starting point for the dubbing.
|
 |
 |
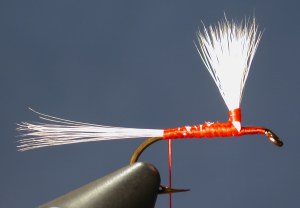
Apply your dubbing to the thread, using less near the hook and gradually increasing the amount as you work down the thread and wind the thread forward up the shank. This creates the tapered look of mayfly abdomens. For a tighter body, use a dubbing wax lightly applied to your index finger before spinning the dubbing material onto the thread. Use firm pressure while pinching and rolling for the tightest bodies (smaller flies) or less pressure if you want a bulkier, more translucent body. Dub the body all the way up to the post, and even a little beyond on the underside.
|