Invicta Flies - Tanning with Alum
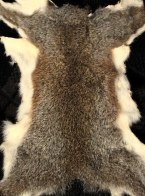 Gray squirrel, alum paste tan, hide broken and soft.
|
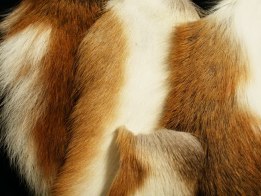 Deer pieces, alum solution, left stiff.
|
Alum tanning is a good method for beginners, or as one of the least expensive to produce a finer finished product than the borax. Not quite as easy to acheive first-time-out as the borax, but still rather simple once you have the formula and techniques down.
There are several different alum tanning chemicals. "Alum" is simply short for aluminum. The easiest (less steps in the process) to use is Potassium Alum, and this is what we'll deal with here.
This tan is not waterproof. This means that exposing the hide to water can cause the hair to slip (fall out) and/or the hide to stiffen dramatically. If you try to dye the hide in a typical hot dye bath, an alum-tanned hide will literally fall apart. So if you think you'll want to dye the fur on the hide after tanning, or use the hair on the hide (for Zonker strips or other) use another type of tanning. Despite this, an alum tan is very good for preserving hides from which you will later be cutting the hair in its natural colors (like squirrel, rabbit, deer, and some fowl).
NOTE: this substance is not to be ingested! Take care, wear rubber dishwashing gloves when handling, and wash your hands frequently.
What you'll need:
1) a workspace free of normal daily traffic
2) rubber dishwashing gloves
3) a large board big enough to lay your hide out flat on
4) old newspapers
5) medium-large garbage bags
6) potassium alum
7) borax
8) uniodized salt
9) sodium bicarbonate (club soda)
10) one-two gallon plastic buckets, preferrably with lids (old five-quart ice cream containers are perfect for small hides)
-don't use metal, as this can cause a chemical reaction with the solutions and unfavorable results
11) kitchen scale for measuring weights
12) measuring cups and spoons (do NOT use those that will be used for food)
13) a plastic or wooden stir stick
14) neatsfoot oil
15) cornmeal
THE PROCESS
If your hide has been in frozen storage (with uniodized salt), place it in a bucket of luke warm water for several hours or until it is pliable. Take this, or a new, thoroughly fleshed hide, and wash it well in a mild solution of warm (not hot) water and dish soap. Be gentle with the hide so you don't pull out any hairs, and wring out by squeezing lightly from top to bottom, letting the water run out.
Again, it should be noted that different ratios of chemicals and solutions produce different resluts. Those listed here are simply the ones that work for me. Compare this with other formulas and methods, and experiment to find one that works best for you, and the result of which is most satisfactory to your needs. Keep a notebook with the formulas you've used and the results. This way, next time you do a hide, you'll know exactly how much of what to use, and the precise method that gets the results you want.
Alum tanning can be done using a paste, or a solution. The paste method is better reserved for thin-skinned animals like rabbit, squirrel, mole, and birds. For thicker skinned animals like deer, a solution is best to penetrate the entire skin. A solution can also be used for the smaller animals.
For preserving materials for fly-tying, I recommend cutting up the hide into small pieces for ease of handling. About a foot square is good. Small animals like squirrel or rabbit can be left whole, but deer should certainly be divided. Keep track of what part of the hide each section came from for future reference.
Choose one of these methods below:
Alum Solution Tan:
The following is good for two, one-foot-square hides (or one if deer is being tanned).
In a plastic bucket, add 16 ounces of potassium alum to one gallon of luke-warm water. Stir in one cup of uniodized salt, then add about a tablespoon of the club soda (sodium bicarbonate). Stir well, then add the hides. Stir the hides in the solution well, but gently. Stir frequently over the next couple of hours. To help keep hides immersed, a rock can be used to weigh them down in the solution. Now it's just a matter of time. I like to put lids on the buckets for safe keeping. For thin skins, forty-eight hours is about right. Deer should be left for about a week. Go back and stir the hides a couple times a day. Another good quality of this tanning method, is that extended time in the solution does little or no harm to the hides. When they are done, they will be primarily white all the way through. If in doubt, cut a small corner and check the cross-section of the hide. If it is white, it is done. There may be some discoloration from blood or bruising, so keep this in mind. If the middle of the skin is still a dull grayish pink, leave the hide in the solution for another day or so.
Alum Paste Tan:
The following is good for one one-foot-square hide like squirrel or pheasant.
In a plastic bucket place 16 ounces of potassium alum. Add a half cup of uniodized salt and a tablespoon of club soda. Now add luke-warm water a little at time, stirring it in until the mixture is paste-like, similar to the consistancy of oatmeal or mashed potatoes.
Cover your board with a trash bag (as a liner of sorts) and lay the hide flesh-side up out flat. Cover the entire flesh with a thin layer of the paste, then work into the flesh by rubbing (be sure to wear your gloves). Next, cover the hide with the remainder of the paste. Cover this with another trash bag, then put the whole board in a bag. Fold the open end of the bag underneath the board and put in a safe place,preferrably at room temperature. Leave it for two or three days, then take the hide out, scrape off the paste, and apply a layer of fresh paste. Leave this for another couple of days, then check to see if the hide is tanned (opaque white all the way through). If it's not done, apply another fresh layer.
Finishing Up:
Larger quantities can be tanned by multiplying the ingredients and using containers large enough.
Whichever method you use, once the hide is done, rinse it thoroughly in luke-warm water. Immerse the hide in a solution of one gallon water and half cup of borax for about fifteen minutes, then rinse well again to remove the borax.
Gently wring as much water out of the hide as possible (take special care with deer, so you do not crush the hollow hairs). If you like, you can use a hair dryer to dry the fur side only (this help the hide dry quicker, especially for deer hair). Lay the hide flesh-side up on your board. Optionally, you can stretch the hide out and tack it to the board to reduce shrinking, but for most fly-tying, this isn't necessary. Otherwise, cover with newspapers and place a little weight on top to keep the hide from curling as it dries.
Now you have to make another decision- will you want your finished hide soft and supple to work with, or stiff? If you want it stiff, simply leave until it's dry. It will be extremely hard and tough, like rawhide, when done. Change newspaper frequently, or retack/restretch if using this method. If you want your hide soft, check it often. When it's almost dry, but still a little damp (it will feel dry but "clammy"), rub a very thin layer of neatsfoot oil into the flesh. If the hide has been tacked down, remove it. Run the flesh side of the hide back and forth over the edge of your board. This is called "breaking" the hide. You can bend and twist the hide to help it along. Continue this until it's as supple as you like. Use fine sandpaper to smooth out any rough spots. Finally, apply another very thin layer of neatsfoot oil (put the oil on a cloth and rub it in).
To keep deer hair straight, take care to lay it in its natural direction while drying, and try not to be too rough when breaking the hide. I usually leave deer hides stiff to avoid damaging the hairs.
To "polish" the fur or feathers, heat some cornmeal in the oven so it's warm but still cool enough to handle. Rub this into the fur well, then shake it out. Carefully run the vaccuum over it to remove any excess.
Conclusion:
This may sound like a lot of work, and indeed it can be if you choose to break the hide, but once you have the finished product, you will know it was worth it. This produces a much nicer material to work with than borax when tying flies, and you may even be proud enough to show off your handiwork to friends and relatives. I have a couple hides from animals I've hunted myself that turned out so well, I won't use them for fly-tying. They are nice trophies of sorts and fine pieces.
If you have any questions or comments, feel free to contact me and I will gladly help.
Good luck!