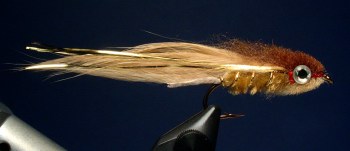
Invicta Flies - Two-Bit Minnow
"Two-Bit Minnow" is a lot easier to say than "Woolhead Rabbit Strip Matuka," yet that's really all this pattern is. Using wool for the head lets you easily trim a realistic shape that seems to mold to the body. Combine with that the fantastic movement of a rabbit strip, and you get this very life-like minnow imitation to catch anything that eats other fish. Try a variety of sizes and colors, to match local baitfish or as attractor patterns.
Hook: Mustad 9672, #2-8 (or other streamer hooks)
Thread: Danville's Prewaxed 6/0, red
Weight: lead wire, .015 (.020 for larger sizes)
Ribbing: medium gold oval tinsel
Body: medium chenille, tan
Wing: rabbit strip, tan
Flash: gold Flashabou
Head: sculpin wool, brown and tan; tying thread
Eyes: 3-D Molded eyes
Tying Instructions:
1) Wind the lead wire onto the hook shank, making 25 close turns. For # 2-4 use .020 lead wire, for #6-8, use .015. Slide this toward the rear of the shank. Attach the tying thread 1/3 shank behind the eye. Slide the lead wraps up to the tying thread, then cover the lead with several open-spiralled layers of the thread, loosely at first, and gradually wrapping tighter. Bring thread to just behind the lead.
2) Secure the tag end of the ribbing along the top of the shank from just behind the lead to the bend. Wrap back over it a couple times to secure well, as we'll be pulling on it quite tightly later. Bring thread to bend.
3) Strip the last 1/4 inch from the tag end of the medium chenille, exposing the core. Tie this in on top of the shank at the bend, then bring the thread to just in front of the lead. Coat the lead wraps with a generous amount of thin, penetrating cement, then immediately wrap the chenille forward in tight turns to the tying thread. Tie off and clip the excess.
4) Cut a 1/8 inch wide rabbit strip as long as the hook. For larger sizes, you may want to use wider and/or longer strips. Use the front 1/8 inch of the strip to tie it in just in front of the chenille body. Cover the rest of the shank up to the eye with the tying thread, then return it to just in front of the chenille.
5) With water, lightly moisten the fur on the rabbit strip, straighten the hairs to stand out from the skin, so it will be easier to wind the ribbing through. Pull the rabbit strip down and back so it's just snug, not too tightly, and seperate with a dubbing needle or your fingers, the hairs just behind the body. Make your first turn of the ribbing through here and around the bare hook shank behind the body. Hold the rabbit strip in place as you tighten the wrap, keeping it on top of the shank. Continue winding the ribbing forward in open spirals through the chenille and rabbit strip wing, securing it along the back, to the tying thread. Tie off on the underside of the hook and clip the excess. Cover any exposed end with the thread.
6) Fold two strands of Flashabou around the tying thread so the ends are even and slide it up to the shank. Take a couple wraps of the thread to secure it right where the rabbit strip meets the chenille. This will give you four strands on one side with minimal wraps of thread. Do the same for the other side, then trim the flash even or slightly shorter than the tail.
7) If there's a hard part to this pattern, this would probably be it if you're not familiar with tying in wool. Basically, you tie in a few sparse clumps on top and bottom. When the head is finish, the wool is trimmed to shape, which flares the hair out and fills in any spaces. From the patch of wool, seperate and clip a sparse clump. For the first clumps on top and bottom, clip a section about 3/4 inch long. Hold this on the top of the shank and take a couple loose turns of the thread. Pull down to tighten while pinching it to keep it on top. Do the same for the bottom color on the underside of the hook, overwrapping the threadwraps for the top clump. When both are tied in, stroke them back and take a few tight wraps of thread just in front to anchor them. Wind forward a couple turns and repeat the process with half-inch long sections of the wool. Repeat until you reach the hook eye. This may seem complicated at first, but through trial and error you'll get to know the process and just how much wool is needed. Avoid trying to get too many clumps in... typically four or five along the top and the same along the bottom is all that is needed.
8) Once you reach the hook eye, stroke the wool back and take a few extra turns of thread, then whip finish and clip the thread. Apply cement to the thread along the shank through the head. It helps to pinch the top and bottom clumps to get them standing more straight up and down. Allow a moment for the cement to soak in.
9) Apply the eyes to either side of the head, on the thread-wrapped shank, slightly back from the middle. Use thick Zap-A-Gap or other strong, waterproof, gel adhesive. Hold the eyes in place until the glue sets up.
10) Trim the head to shape with scissors. Leave some of the fibers at the back of the head long enough that the wool creates a smooth transition into the body.
Notes: Personally, I like the looks of the #4 and #6 sizes best, but vary the hook size and style to create any shape. Keep in mind that the thread will show in the head, as in the sample above, where I used red thread to add color to the head area. The example below shows a #2 long shank streamer hook (Mustad 3665A) and a slightly longer tail. For the eyes, 3-D eyes look the best, but doll eyes and primatic stick-on eyes can also be used.
