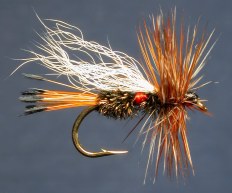
Invicta Flies - Royal Trude
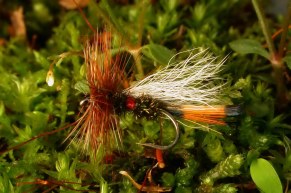
Though this is a common pattern, I have added it here to illustrate some methods I have found to make the fly quite a bit more durable. When fishing the Royal Trude, I apply floatant to the wing and hackle only, allowing the body to rest below the surface as an emerger.
 |
 |
Hook: Mustad 94840, #12-16
Thread: 6/0 brown
Tail: golden pheasant tippets
Body: peacock herl divided by a section of red floss
Wing: white calf tail
Hackle: brown or medium ginger
Tying Instructions:
1) At the bend, tie in a clump of golden pheasant tippets, length equal to hook shank. It is helpful to align the tips while still on the feather. Typically, about 14 fibers is good for a size 14, a dozen for size 16, and so on. Hold the aligned clump at a slight angle on the near side of the shank. Take a full, somewhat loose turn of thread, then another tighter one in front of it, pull down to fully tighten while still holding the fibers in place. Two more tight turns forward secures the tail. Release the fibers and trim excess butts.
2) The thread should now be somewhere between the bend and the hook point. Form a loop with the thread about four inches long by folding a length of the thread over a finger of your left hand or a bodkin, and wrapping back over it to the bend.
3) Take three or four fibers of peacock herl, align the tips. Give a slight tug to expose any weak points, at which the fiber will break. Realign if necessary. Tie the herls in by the tips, winding forward with the thread as you lash it to the top of the shank. The butt ends should be extending beyond the bend of the hook. Bring thread to a point on the shank that is directly above the hook point. Take the peacock herl and thread loop, and twist them together to form a rope. The thread loop helps to reinforce the fragile herl. Hackle pliers or similar tool helps form the rope. Once formed into a full, tight rope, wind forward to the thread, and tie down. Wind forward with the thread about one and a half hook eye widths, then back. Remainder of herl rope should now be extending forward beyond eye.
4) Tie in the red floss directly above the the hook point. Take about three or four turns, untwisting it to keep it wrapping smooth and flat. Overlap the turns on top of each other. Tie off the floss just in front of the tie-down area of the herl rope, and clip. Apply a drop of head cement to the floss section and allow it to dry a few minutes before continuing.
5) Bring thread forward to halfway between hook point and eye. Continue winding the herl rope forward (respin if necessary), tie off and clip the excess.
6) Cover the remainder of the shank with a layer of thread, creating a foundation for the slippery calf tail wing. Clip a bundle of calf tail about half a matchstick in diameter. Hold by the tips and remove the shortest fibers. Grasp the clipped ends with the other hand and remove any excessively long fibers. The remaining bundle should be just about right for a size 16. For a size 12, use two clumps of this size, tying each one in seperately, the second direcly on top of the first. To tie in one clump, or the first of two clumps, gather the fibers of the bunch as tight as possible between your fingers, taking care not to pull them too much out of alignment. Measure for length- the wing tips should extend to the tip of the tail. Hold against the shank at about a 45 degree angle. Take a full turn of thread, tight, but just loose enough that it doesn't pull the fibers around the shank. Pull down on the thread to apply some torque, bringing the butt ends up on top of the shank. Take a turn behind the first, then another in front of the first. Still holding the bundle of calf tail, clip the excess butts at an angle. Release the bundle of calf tail. At this point, if you need to straighten up the wing you can do so carefully. If all is well, apply a drop of head cement to the clipped ends, allow to soak in a bit, then cover with thread.
7) You can tie in the hackle as usual and wind it forward, or for added durability do the following: bring the thread to about one thread width behind the eye. Clip about six fibers on either side of the butt end of the hackle feather, and tie this section to the top of the shank, the dull side up. Bring the thread back the rear of the tie-in are of the wing. Now wind the hackle backwards to the thread and tie off with three turns of thread. Spiral the thread forward though the hackle, rocking it back and forth to avoid trapping any fibers. At the eye, tie a whip finish knot, clip the thread, and cement the knot. Sneak in with scissors points to clip the tip of the hackle feather.
Variants: There are many variants of the Trude, but my favorite is a Royal Trude with a mixed brown and grizzly hackle. On one particular stream, this variant catches fish year-round, even in 34 degree winter, no-hatch weather.