Invicta Flies - Deer Hair Popper, page 2
Tying Instructions (continued):
Step Three- collar
 |
For the collar, select two saddle hackle feathers similar to those used for the tail. I'll be using olive and chartreuse. Stroke each feather from tip to butt to get the fibers to stand out almost straight from the stem. Place them together and align them so most of the fibers on both feathers are matched up and even.
Measure these against the hook and find the point on the feathers where the fibers are a lit bit longer than the hook gap. Clip off the tips of the feathers here, leaving about 1/4 inch of the stem for tying in.
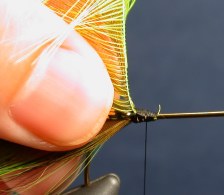
Wind the tying thread back, stopping about two hackle hackle stem widths from the very rear of the tying area. Tie the collar feathers in here by the tip, leaving a thread width between the first wrap of thread
|
and the first hackle fibers. It is helpful to place the stem of the front feather against but above the stem of the rear feather. Take a couple loose turns of thread with the feather stems about 30-45 degrees to the hook shank. Pull down on the thread while holding the feathers in place to tighten. Take a few more tight turns of thread in front of the first couple to secure, and continue wrapping forward to the front of the tie-in area. Now wrap back to halfway between here and the tie-in point of the collar feathers.
 |
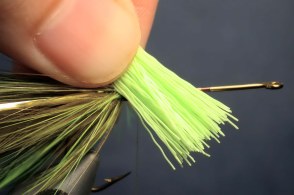
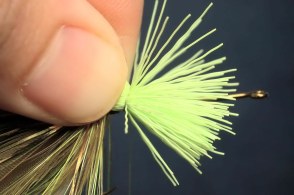
Keeping the feathers aligned, lift them together and use your index finger and thumb to "pinch" and fold the fibers back. Hold these fibers in place as you make your first wrap around the shank. Continue to stroke the fibers rearward on the next wraps, as you lay each wrap against the previous one. Four or five wraps should bring you to the tying thread.
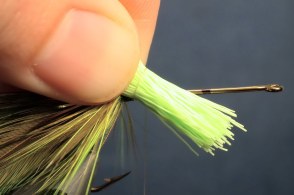
Hold the feathers in place and take three tight turns of thread to secure them. Clip the butt ends.
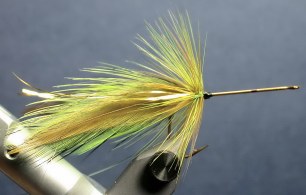
Now stroke the fibers back and wind the thread to the rear, taking two or three turns over the last wrap of hackle. This will give the collar a permanent lean. Be careful not to over-do this. We want the collar to lean just slightly. (see photo below)
|
Wind the thread forward and create a smooth, sharply tapered "head." Whip finish the thread, clip it from the hook, and cement the wraps well. Allow some time for this to dry completely before moving on to the body.
 |
 |
For a different look, you can add a feather to the front of the collar, such as guinea hen, pheasant, or mallard flank, dyed to match the body. Keep this down to one or two wraps and the tips as close to even with the hackle fiber tips as possible. Do not substitute these feathers for the saddle hackle completely- use at least one to help support the softer body feathers. Additionally, on poppers, where we want the fuller collar, avoid very soft feathers like marabou, which will absorb more water and force the collar back into a non-moving part of the tail.
Step Four- body
Look closely at the photos above. Halfway along the bare shank you will see a black mark. This is where I'm going to add legs later. Once you start spinning the body, it gets harder to tell where this point is. A small mark with permanent marker will let you know when you've reached the place for tying in the legs.
Secure a strong thread for spinning immediately in front of the collar. I usually use 3/0 waxed monocord, but you can also use Kevlar thread or any of the other stronger threads. Be aware, though, that some threads for spinning are very thick...these won't break on you, but you really have to load up the deer hair to make up for the gaps the thick thread leaves. The waxed monocord, when the bobbin is spun, becomes quite thin, yet it doesn't cut through the hairs the way some fine diameter, strong threads will. Its drawback is that it will break if too much tension is applied.
For this fly, I'm going to build the body of deer hair by spinning it. Optionally, you can make a two-tone body by tying in one color on top, not letting it spin all the way around, and another color on the bottom. You can also stack different colors on top of each other to create circular patterns. A few other techniques you can experiment with: place two different colors together and use this as the "top" color, with a third for the belly (creates a mottled back); mix two colors thoroughly before spinning for a "peppered" look; use a combination of all of these for a specific color pattern, such as that found on frogs or various baitfish. Use you imagination and be as creative as you like. Here, however, I just want a simple body with a different color head- chartreuse and olive, seperated by a band of black.
   |
Be selective when getting your deer hair. The best for spinning is long enough that you won't end up with tips in the final trimmed body, is somewhat flexible (not brittle), and thick enough to be "sponge-like" (you can feel the give when you squeeze it, but it springs back into shape).
Clip a bundle of deer hair about as thick as a pencil. Clean out the fine underfur with your dubbing needle or a fine-toothed comb. Don't skimp on this part- the more thorough you are with this part, the easier it will be to spin the hair and your fly will look and perform its best.
For the first couple of clumps, before spinning, trim away
the tips so the remaining butt ends are slightly longer than the hook gap. This prevents the spinning clump from catching on the hook point.
Place the deer hair clump at an angle against the near side of the hook shank, at about the middle of the clump. Take two loose turns of thread around it in exactly the same spot (lay the second wrap directly on top of the first.
Hold the bundle as you pull down on the bobbin slowly and smoothly to tighten the wraps. The hair will begin to flare.
When you've tightened the thread about as far as it will go with medium tension, release the bundle and let it spin around the shank slowly. As it's doing this, take a third turn of thread through the flared clump and apply some torque by pulling downward. You can help it along by rocking the bobbin a little and "fluffing" up the hairs. Take a fourth turn through the clump and tighten.
Carefully (so you don't bend the hairs) stroke all the hairs back and push/pull the clump reaward to compress it. Work the thread through the fibers and take two turns directly in front of the spun clump. Use a packer or (as I do) your thumbnail and fingernail to push the thread back along the shank, further compressing the clump. Immediately take another turn of thread directly on op of the previous ones.
|
Add a drop of head cement to the thread wraps. I like to apply the cement every three or four clumps. Does this help? I don't know for sure but it seems like it would and I've never had a bass bug fall apart. I figure if I'm going to spend quite a bit of time making a nice bass bug, I want it as durable as possible!
Spin another clump onto the shank in the same way. After two or three clumps, it will no longer be necessary to trim away the tips. Continue with additional clumps up to the tie-in point for the legs. Once there, take an extra turn of thread and definitely cement this so it stays in place while we do the legs.