Invicta Flies - Deer Hair Popper, page 3
Tying Instructions (continued):
Step Five- legs
If you choose to add legs to your popper, there are a few different ways to do this, each with different results. I'm going to use a method that puts two legs directly out to the sides, and two more that protrude from the bottom out to the sides. To do this, use round rubber leg material, medium or large in diameter. Turn the hook over in the vise to perform this step on the underside of the hook.
 |
Trim two strands of the leg material so they are twice as long as the hook (for skinnier poppers, trim them twice the shank length). Hold them together so the ends are even, then place against the shank at an angle, similar to the position for the deer hair. Take one loose turn over the strands, come under the shank with the thread, then up on the near side in front of the strands (between the hook shank and the leg material that is pointing downward). The section you are holding will be the legs on the far side, so go ahead and pull them gently over while pulling up with the thread. Immediately take the thread across the strands on top and down behind the legs on the far side. Come under the shank, then up on the near side behind the legs on that side. Continue by crossing over
|
the top of the strands again, going down on the far side in front. Take two turns of thread in front.
Basically, we have criss-crossed the thread over the strands to tie them in. You will notice this flares the rubber a bit where the thread has pinched it down. Push back on the thread with your fingernail and thumbnail to pack the legs into the deer hair. This will force one strand under the other. Take one more tight wrap of thread to hold it in place, then cement well. Allow this to dry before continuing with the body.
To get two legs on each side protruding from the same spot, use flat leg material tied in the same way, or tie one strand on top of the shank, another on the bottom. You can also tie in one strand, spin a clump of deer hair, then tie in another strand in front of that (be sure to tie these in on the underside of the hook shank).
Rubber strands tend to misbehave and twist. Keeping your criss-cross wraps down to a bare minimum, and not applying too much tension to the thread will help with this.
Step Four- finishing the body
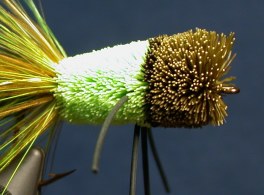
Spin another clump of chartreuse deer hair in front of the legs, then a clump of brown. Finish up with the olive deer hair up to the hook eye. When you pack and compress the last spun clump, you should have about half a hook-eye's width of space left on the shank. This space will give us room for the weedguard and enough space for a clean whip finish knot at the end.
  |
Here's a nifty little trick to help you get the spun hair up closer to the hook eye. Hold the clump in your right hand (if you're right handed) and divide it into two even sections as shown in the photo. Use your other hand to drape the tying thread over your fingernails. Pull down on the thread to slide it off your nails and onto the deer hair. Do this a second time. When both wraps are on the thread, pull down to tighten them, at the same time pushing the clump into the body. You will feel the thread get snug and the hair want to turn. When you do, let go and allow the hair to spin. Take another tight turn through the middle of the spinning clump, tighten down, then compress it and work the thread through to in front. Secure with three wraps of thread and compress some more as in building the body.
Stroke all the fibers back and whip finish the thread. Take care not to trap any fibers in the knot. This may require a little wiggling and working of the thread. You can also use a bodkin to pluck any trapped fibers out from under thread before the knot is tightened. Clip the thread and cement the knot.
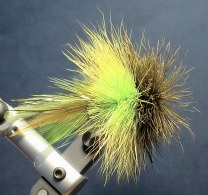
Fluff up the deer hair and shrug off any comments from on-lookers who don't know any better. Use your fingers (for the fluffing, not the shrugging!) or to really get the hairs to stand out, use pliers to hold the fly in the steam from a tea kettle for a few seconds.
Now you need to decide what kind of shape to give your popper body. It can be uniformly circular from front to back, tapered, tapered with a wide, flat profile, you decide. Personally I like the tapered-wide-flat body for bass.
|
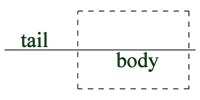 Circular
|
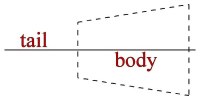 Tapered
|
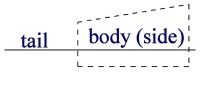 Tapered/Wide/Flat
|
You can use either scissors or a razor blade to shape the body. Try both. I do better with scissors, others do better with a razor blade. If you use the blade, be sure it is brand new. You might get away with two bugs on one razor, but beyond that the edge is dulled enough to be inadequate. This of course will vary depending on the quality of the razor.
One of the most useful tools to help shape a deer hair body doesn't cost much... a flat toothpick. Mark on the toothpick with a fine pen to show how wide the face should be (the length of the hairs out from the hook shank) and how short to make the belly hairs. Then just trim the hair where the marks are. Put the toothpick in the hair longways to show where the shank is. This will help you visualize a balanced shape.
Take your time when trimming the hair. Do it in two or three seperate sessions if necessary. Stay relaxed, make your cuts, turn the fly over and look around to check the progress from all angles, and measure with the toothpick often. I like to cut a generally geometric shape first, starting with the bottom, then the top, and finally the sides. From here I simply round off the corners.
Pull the rubber legs down out of the way when trimming the sides. If you're holding the fly by the hook bend to trim, use the same fingers to hold the leg strands.
 |
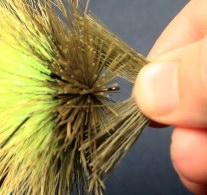
Be careful when you get near the collar so you don't trim any of the feather fibers. Stroke the collar back to expose the deer hair for trimming, then pick out any individual "trapped" hairs and trim them one at a time.
For the bottom of the fly, if you're using the tapered/wide/flat shape, trim straight from front to back parallel with the shank. Make this the shortest side, but at a minimum of about two hook-eye widths. Trim this too close to the shank and your fly will become too top heavy and land upside down on the water, particularly if there are no legs, or if a leg style other than the one I've demonstrated is used (the legs coming out of the bottom of the fly help the fly land
|
right side up). Round off the edges on the bottom for a softer landing on the water, or leave it flat to make the fly "smack" when it hits. Both styles have their uses.
Step Five- finishing touches
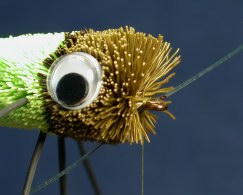
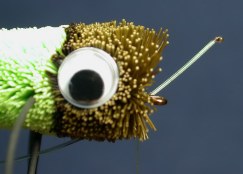
Eyes- First decide what kind and how big. Doll eyes (moving black pupils) are nice on poppers and can easily be found in white or yellow. Optionally, for a more realistic look, the molded 3-D eyes work very well. In the photo below is a 7mm doll eye (on a size 6 bass bug hook). For a smaller, more subtle eye, go with a 4mm on this size of hook. If the eyes are sold in inches, use 5/16" (which is slightly larger than 7mm) for a large eye, or 1/4" (slightly larger than 4mm) for the smaller eye.
There are two different ways to apply the eyes. One way is to trim out a slight depression in the body where the eyes are to placed...a socket where the eyes face straight out to the side. Another way is to simply "push" the eye onto the body, forcing the hairs rearward. This later method can produce a color pattern where the deer hair fibers flare rearward from the eye and end up facing a little more forward.
Use Goop, Zap-A-Gap, or similar waterproof adhesives to glue the eyes on. Experiment to see which product you like to use best. I prefer something thick enough to smear a drop onto the deer hair where the eye is to go. Then I just place the eye onto the glue and move into position.
  |
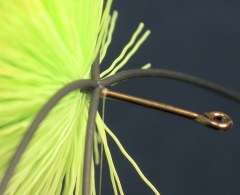
Weedguard- Attach the 6/0 thread to the shank again, just behind the eye. Bring the weedguard up under the fly and take two loose turns of thread to hold it in place behind the eye.
Slide the mono through the thread wraps until is at the desired position (a loop just large enough that it doesn't overlap the hook bend). Use a felt-tip pen to mark on the mono at the shank...this is how long we want it to be). Now pull it further through the thread wraps.
There are two different things we can do here. One is to clip the mono right at the mark, pull it back down to the thread wraps, then cement with Zap-A-Gap (which will "fuse" to the mono). Another method is to trim about 3 or 4 mm in front of the mark, then use a lighter to melt the mono back to the mark, forming a ball shape. Be careful when doing this and be prepared to blow out the flame quickly should the mono catch fire. Let the melted mono cool, then pull it down to the thread. Use your fingers to slide it to the underside of the shank and take a couple tight turns of thread to secure it. Be sure the melted "ball" is not so big as to significantly decrease the inside diameter of the hook eye.
Whip finish the thread and apply head cement.
For a better "pop" when fishing the fly, coat the face of the popper with Dave's Flexament. Spread this on with your bodkin and allow some
|
time for it to dry. Now you can trim any extra long fibers from the face.
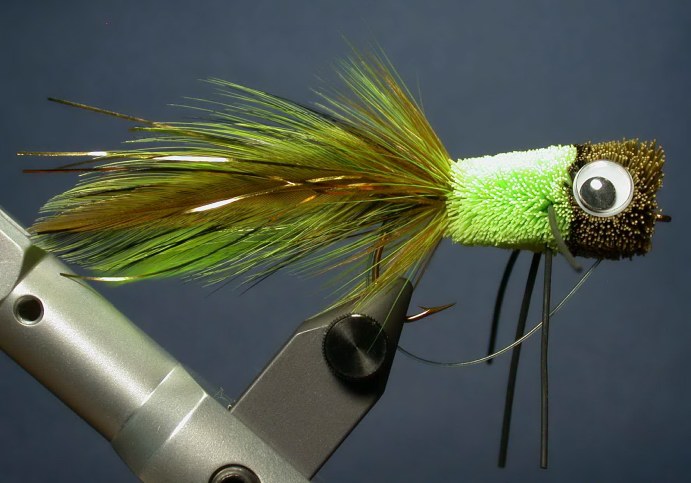
And there you have it! The first few may take some time to tie, but the finished product is usually well worth it and something to be proud of. The more time you invest in your bass bugs, the better you will become at tying them, and the better your flies will perform. The only thing left to do is offer it up to the local bass to get their approval.